

Try the subscribe with built-in consent and broadcast flow
With XMTP, messages from a contact you haven't messaged before are kept out of your main inbox until you explicitly approve the contact. Only then can the messages display in your main inbox. This helps you keep your main inbox free from spammy and scammy messages.
XMTP user consent preferences enable apps to display messages from approved contacts in a user’s main inbox, while unapproved and scammy/spammy messages are kept out of the way in secondary UIs
When broadcasting messages with XMTP, it's important to ensure recipients have approved a broadcaster as a contact. This allows the broadcaster’s messages to display in recipients’ main inboxes, instead of being hidden away on a spam tab.
An efficient way to achieve broadcast approval is to use a Subscribe button backed by built-in consent, for example.
The button enables people to sign up to receive a broadcast in end-to-end encrypted messages at their connected wallet address. When people click Subscribe, they're also approving the broadcast address as a contact.
This tutorial describes how to use the broadcast-example-api repo and subscribe-broadcast repo to try out the subscribe and broadcast flow.
In this tutorial, we will:
- Set up an example broadcast API
- Set up an example subscribe-broadcast web page
- Send an example broadcast welcome message
- Send an example broadcast message
- Check the status of the example broadcast message
Set up an example broadcast API
See the README in the broadcast-example-api repo.
Set up an example subscribe-broadcast web page
See the README in the subscribe-broadcast repo.
Send and receive the example broadcast welcome message
Now that you have the example broadcast API and example subscribe-broadcast page running, let’s use them to send and receive an example broadcast welcome message to a new contact/subscriber.
- With the example subscribe-broadcast page running, go to http://localhost:3000/subscribe/button.
- Connect the wallet you want to subscribe to the broadcast. To demonstrate the consent feature of the Subscribe button, be sure to connect a wallet address that has not already exchanged messages with the broadcast address.
- In the broadcast dropdown menu, select the broadcast you defined when setting up the example subscribe-broadcast web page.
- Click Subscribe.
- Go to XXXXXXxmtp web app on devXXXXXX and connect the subscribed wallet address. The example broadcast welcome message displays in the main inbox. You defined the broadcast welcome message as a part of setting up the example broadcast API.
Send an example broadcast message
You can also use the example subscribe-broadcast page to send an example broadcast message.
- In the broadcast-example-api repo, update
addresses.jsonto include only the address you just subscribed to the broadcast. - With the example subscribe-broadcast page running, go to http://localhost:3000/Broadcast.
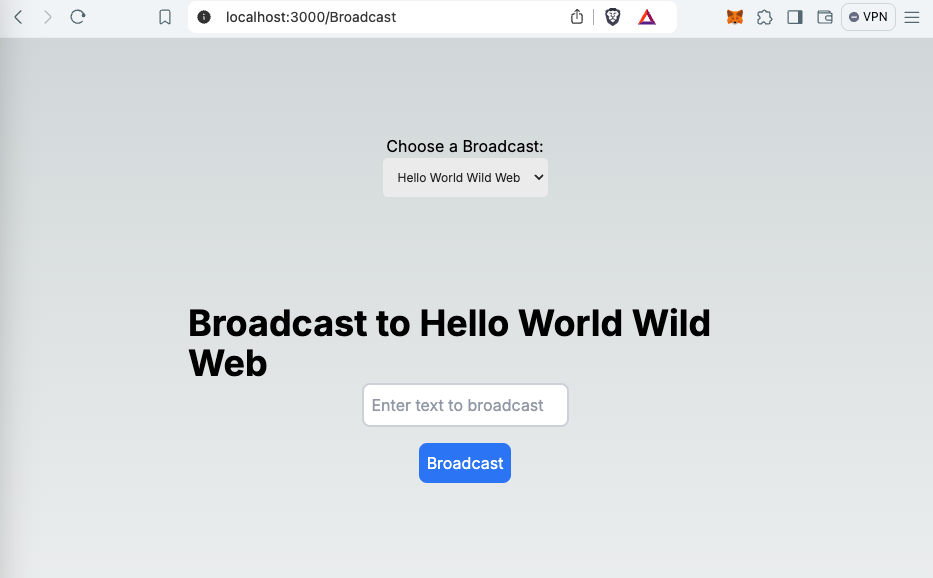
- In the broadcast dropdown menu, select the broadcast you defined.
- In the broadcast text field, enter example broadcast text.
- Click Broadcast to send the example broadcast text to the subscribed address.
- Go to XXXXXXxmtp web app on devXXXXXX and connect the subscribed wallet address. The example broadcast message displays in the main inbox.
Send an example broadcast message via CLI
Alternatively, you can send an example broadcast message via CLI and cURL instead of using the subscribe-broadcast page.
In this case, we can send a POST request to the http://localhost:6989/broadcast endpoint.
As with the subscribe-broadcast page, the message is sent to the address(es) in the addresses.json file at the root of the broadcast-example-api directory.
Request body
| Parameter | Format | Description |
|---|---|---|
| text | string | Required. Message text you want to broadcast. |
| address | string | Required. The broadcasting raw Ethereum 0x wallet address. |
Example request
curl -X POST http://localhost:6989/broadcast \
-H "Content-Type: application/json" \
-d '{
    "text": "Hello, this is a broadcast message!",
    "address": "<Replace with your broadcast wallet address>"
}'
Response body
| Parameter | Format | Description |
|---|---|---|
| broadcastId | string | Unique ID for the broadcast. You can use it to track or query for the broadcast and its status. |
{"broadcastId":"ee21a960-310e-446b-ac41-5665ae1906e6"}Check the status of the example broadcast message
In addition to checking the main inbox for the subscribed address, you can use the example subscribe-broadcast page to check on the status of the example broadcast message.
Go to http://localhost:6989/broadcast?broadcastId=<broadcastId>
For example, http://localhost:6989/broadcast?broadcastId=0624abaf-0312-4653-8236-1ff6bda21328
The page displays the following information about the broadcast:
{
  "id": "c49ce40e-93ea-489c-938f-89d46b7cc6e9",
  "address": "0x62EEd858af7590fbCaE803d208c53ddBb0D1309c",
  "message": "here's a new test message yo",
  "recipients": 1,
  "sent": 1,
  "startTime": "2024-08-23T00:09:02.408Z",
  "status": "completed",
  "endTime": "2024-08-23T00:09:02.655Z"
}| Parameter | Format | Description |
|---|---|---|
| id | string | ID of the broadcast |
| address | string | Address of the broadcast sender |
| message | string | Message sent in the broadcast |
| recipients | string | Number of recipient addresses included in the broadcast |
| sent | number | Number of messages sent |
| startTime | string | Time the broadcast started |
| status | string | Possible values: Sending, Waiting, Completed, and Failed. |
| endTime | string | Time the broadcast ended |
Check the status of the example broadcast message via CLI
Alternatively, you can check the status of the example broadcast message via CLI and cURL instead of using the subscribe-broadcast page.
In this case, we can send a GET request to the http://localhost:6989/broadcast endpoint.
curl -X GET "http://localhost:6989/broadcast?broadcastId=0624abaf-0312-4653-8236-1ff6bda21328"